Showing posts with label Emboss Resist. Show all posts

Sunday, February 28, 2016

Das doppelte Lottchen #157


It's sunday, that means it's Lottie and Lisa time! 

Lottie and Lisa means Anni and I usually pick a stamp or stamp set or die that we both have (we nearly have the same taste!) and create a card with this product and another task.
Today I made a wish, and it is:
Stampotique - Owl See You

&

be inspired by this mood board:


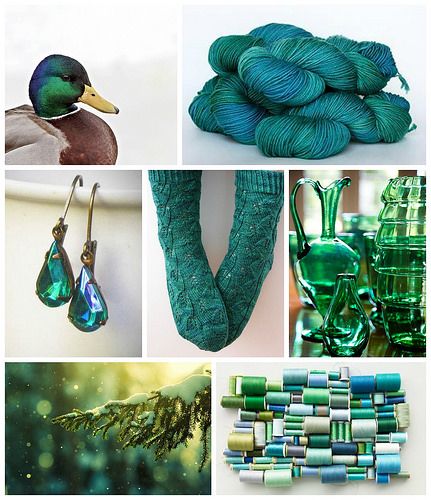
As you know i love eveything turquoise so when I saw this moodboard I instantly fell in love and had to use it as a challenge for us.
I wasn't too happy about the card at first but the longer I look at it the better it gets:


I felt so disappointed that you can't really see die dit cut background, but well - the all over design might be okay:


Now hop over to Anni's blog to find her creation :) She'll knock your socks off ;)

Thanks for viisting!

Monday, October 12, 2015

MFT Bears in the house (+new Create A Smile products)

Hello crafty peeps :)

I'm here to share two cards today. I ordered some My Favorite Things stamps from Butterfly Reflections Ink and my order arrived on Friday. Luckily I have some time off now and managed to get some crafty time this week-end, so I played with my new goodies.

These are the cards:

1) Nur mit Euch ist Weihnachten schön
The sentiment says "Christmas is only nice with you" and is from a new Create A Smile sentiment set that will be released on Saturday (along with the Snow Dance Kit - wohoooo!)


Allsorts - no design Paper
Virginia's View - All things colored
Merry Monday - Java time


2) Zum Geburtstag für Dich
That little baby bear is so super cute, I just had to use him on my boy-birthday card. (sentiment can be translated with "for your birthday".
These dies are a sneak peak of upcoming products (November) - I just couldn't resist using them... oops! ;)


Seize the birthday - Anything goes
Alphabet challenge - quick and simple
My time to craft - autumnal colors
Creative Friday - tierisch gut


Now I'd like to share the  new Create A Smile products that will be released on Saturday. The release countdown full of inspiration will start today over at the Create A Smile blog - join the fun! :)


Thanks for stopping by - it's much appreciated :)


Tuesday, July 28, 2015

Can't stop crafting

Yes, it's true - now that i have some time off I just can't stop stamping, coloring, fuzzy cutting, assembling...  I even dreamt of making cards during the last nights. Seems I missed crafting a lot.

So, three more cards for you know (I have way more, but again - I'll split it up so you don't get overwhelmed.)

1) Fühl Dich umarmt (feel hugged)

Another new stamp - that mushroom stamp from Personal Impressions' Zentagles series is just adorable. Still it's pretty dark if stamped in black, so I knew white embossing and a rainbow would look good on it. I loooove how this turned out, even if fuzzy cutting took some time.

The sentiment is from Create A Smile's "Hey Quatschkopf".


Addicted to stamps and more - CAS
Happy Little Stampers CAS challenge - stamping
CASual Fridays - Embossing


2) Echt? SO alt? (Really? THAT old?)
I practiced my Polychromos coloring last night and I think this little dinosaur-like monster by Paper Smooches turned out nice. I used some paper scraps from create A Smile's Feel Good Paper Pack and used a new stitched-line die so make the scraps look as if they were sewn on to the card base. Just a little detail, you know?


3) Liebste Grüße (kindest regards)
This is a super simple cards with lots of shapes cut with my Silhouette (The circle and frame, the heart, the plants). Super simple but bright and therefore kind of eye-catching. Bright pink with green might be a combo I love, even if I don't like pink a lot.
Just to say a nice hello to a friend. :)


I'll be back soon with more cards. Thanks for checking back!
Christine

Sunday, July 5, 2015

Das doppelte Lottchen #136

It's sunday, that means it's Lottie and Lisa time!

That means Anni and I usually pick a stamp or stamp set or die that we both have (we nearly have the same taste!) and create a card with this product and another task.
Today Anni made a wish, and it is:

Hero Arts - Small Solid Flower
&
Metal

When I first read about this challenge I was like - oh... metal?! I thought about charms - but I don't like them on cards. Metal foil - uhm... no.
So I went for some stamples! Easy, subtile, but a nice detail. 

  • I embossed the small solid flowers and more Hero Arts flowers with silver Pearl embossing powder onto vellum and used my blending tools to add color on top.
  • The front panel is slightly smaller than my long cardbase and got rounded corners. I also drew some false stitching to add some extra pulling the card together.
  • I cut the flowers out with some extra space and stapled them onto my card panel. 
  • See the sentiment? It says "Happy Birthday" or "Congratulations" and is from a new Create A Smile Set that will be released on friday. Woot woot! :) I stamped it with Versafine Black Onyx Ink.
  • Popping that up onto the card adds some simple dimension.


I love how this card turned out. The silver peal embossing powder also has a metallic shine, so it goes super well with the staples and the colors just POP! That extra long card allows the colors to shine and have some space.


A2Z Scrapbooking - Clean And Simple (use at least 1 Hero Arts item)


Now it's time to hop over to Anni's blog to see what she created.

Thanks for stoppin' by! :)
Christine

Monday, May 25, 2015

Negative Die cuts and emboss resist with Penny Black

Hi everyone,

this is my next post as a


That means I create Clean and simple cards using fantastic Penny Black products! Lucky me!
You can find amazing CAS inspiration on the Simplicity Blog - I am surrounded by ah-mah-zing designers. There's inspiration twice a week - and every designer will also post fabulous projects on their own blogs (just like I am doing now)

This is my card for today:


I'm totally into ink-blending these days, and I really thought the dandelion-like flowers from Penny Black would be perfect for emboss resist. 
When I had cut the round panel and thought about the sentiment I decided to make a card without any black at all and use a die instead. i love how this turned out!

Here's a close up at the colored image:


Look at the depth you get with that neative die cut sentiment. It adds so much interest so a very quick and easy card!


  • Stamp your image on your cardbase with versamark ink and clear emboss.
  • use an ink-blending tool or sponge to add Distress inks to your background.
  • Cur a panel with a rounded top (I used my circle cutter) from white cardstock and cute the sentiment out it this panel.
  • punch or cut some "slids" for the twine (so it won't move around" and tie a bow with your twine.
  • Adhere that panel to your card front using dimensional adhesive.
  • Die cut the little butterfly and add it to your card.
  • Embellish with enamel accents and sequins.
This card is super easy and was made in about 15 minutes :)


Stamps: Penny Black (Flower Sparks)
Ink: Distress Ink (Stormy Sky, Peacock Feathers, Cracked Pistachio), Versamark
Embossing Powder. Wow Clear Gloss Superfine
Cardstock: Exacompta Cardfile
Twine: Trendy Twine (Tickled with Teal)
Embellishments: Stash


Challenges:
CAS on Sunday - Bingo (Birthday, Butterfly, Twine)


Thanks for stoppin' by - hope this was somehow inspirational :)

Thursday, January 1, 2015

Finally - a new video :)

Happy new year!

Hope you all had a good start to 2015 - i dure did. (We had a friend with us, played games (Carcassonne) and ate Raclette (is that a internationally known thing? I have no idea...). It was wonderful.
Well, I'll never be a fa of fireworks, I think they're useless and mean to all the poor creatures outside, but dispite that I really enjoyed the night.

I also made a video that I finished this morning - so I can finally share anotehr video with you. (I feel bad I am not able to make a video for each tuesday at the moment... boo!)

I created this male Valentine's card:


I had not made a watercolor card for quite a while now and thought they would make a nice background for the large chipboard letters. I badly wanted to use those ;)


Stamps: Create A Smile - Balance

Chipboards: Create A Smile - Alphabet

Die: Simon Says Stamp Circ e Border
Embossing Powder: Wow Clear Gloss ultra fine, Hero Arts white
Ink: Versamark

  • Using the blending tool with Versamark ink adds more options to partial heat-embossing.
  • A regularly patterned washi tape makes it easy to mask off the edges correctly and even
  • Add layers of watercolor to control the amount of color
  • use your heat gut to move the watercolor on your paper

Hope you enjoyed the video - maybe I'll have another one on sunday.. I'll try ;)
Stay tunes and follow the Create A Smile Blog to see all the fun things coming up this year. The new release is coming up NEXT WEEK!.. Woohoo!


Challenges:
Simon Says stamp - anything goes
House of cards - Photo inspiration:
glittered (blues)

Saturday, December 13, 2014

Penny Black SImplicity Sister Part I :)

Hey there,

my facebook friends already know this, but I haven't shared the great new over here, yet.

I feel honored that I was asked by Penny Black to join their Simplicity Sisters for the next 6 months - woot woot!


You can find amazing CAS inspiration on the Simplicity Blog - I am surrounded by ah-mah-zing designers - and so honored! There's inspiration twice a week - and every designer will also post fabulous projects on their own blogs (just like I am doing now)

This is my card for today:


I just love White Mbossing with watercolor and Penny Black has some really gorgeous flower-stamps, so this is - in my opinion - a match made in heaven!


  • stamp the Flower and the leaves with Versamark ink and white emboss them.
  • press your distress ink pad onto an acrylic block and use a paintbrush with water to color the images
  • stamp the string and bow with black ink onto your card base and add the sentiment
  • take a pencil to give some shape and dimension to your petals and leaves
  • use dimensional adhesive to adhere the images to your card front
  • add some more interest with pearls 

Stamps: Penny Black (Petal Party, friendship, embellishments)
Ink: Versamark, Versafine, Distress Ink (mustard seed, spiced marmelade, peeled paint, mowed lawn
Cardstock: Exacompta card file
Embellishments: stash

Curling the petals a little up gives much more dimension and interest to the card and makes it look very different from a version with a flat flower. You should for sure try this out!


Have a nice week-end (and thanks for staying tuned even if I am not a super-blogger anymore at this time.... It is so much appreciated that you still visit this place ;) )


© Kartenchaos. Powered by